Spring 源码学习(三)自定义标签

看了这篇,自定义 Spring 标签不是梦~

Table of Contents generated with DocToc

又来填坑啦,上一篇讲完默认标签的解析,这篇笔记记录一下自定义标签的解析吧。

我们知道,Spring 源码的核心模块是 Spring-coreSpring-beans,在此基础上衍生出其他模块,例如 contextcachetx 等模块,都是根据这两个基础模块进行扩展的。

聪明如你,应该想到我们代码中常用的缓存注解 @Cacheable、事务注解 @Transaction,还有阿里巴巴的 RPC 中间件 Dubbo,在配置文件中通过 <dubbo:service/> 或者 <dubbo:reference/> 进行服务注册和订阅,这些都都属于 Spring 的自定义标签的实现,通过自定义标签可以实现更加强大的功能!

作为一个有追求的程序员,当然不能满足于框架自带默认的标签,为了扩展性和配置化要求,这时候就需要学习自定义标签和使用自定义标签~


官方例子

先来看一张源码图片(红框框圈着是重点哟)

myname_default_define

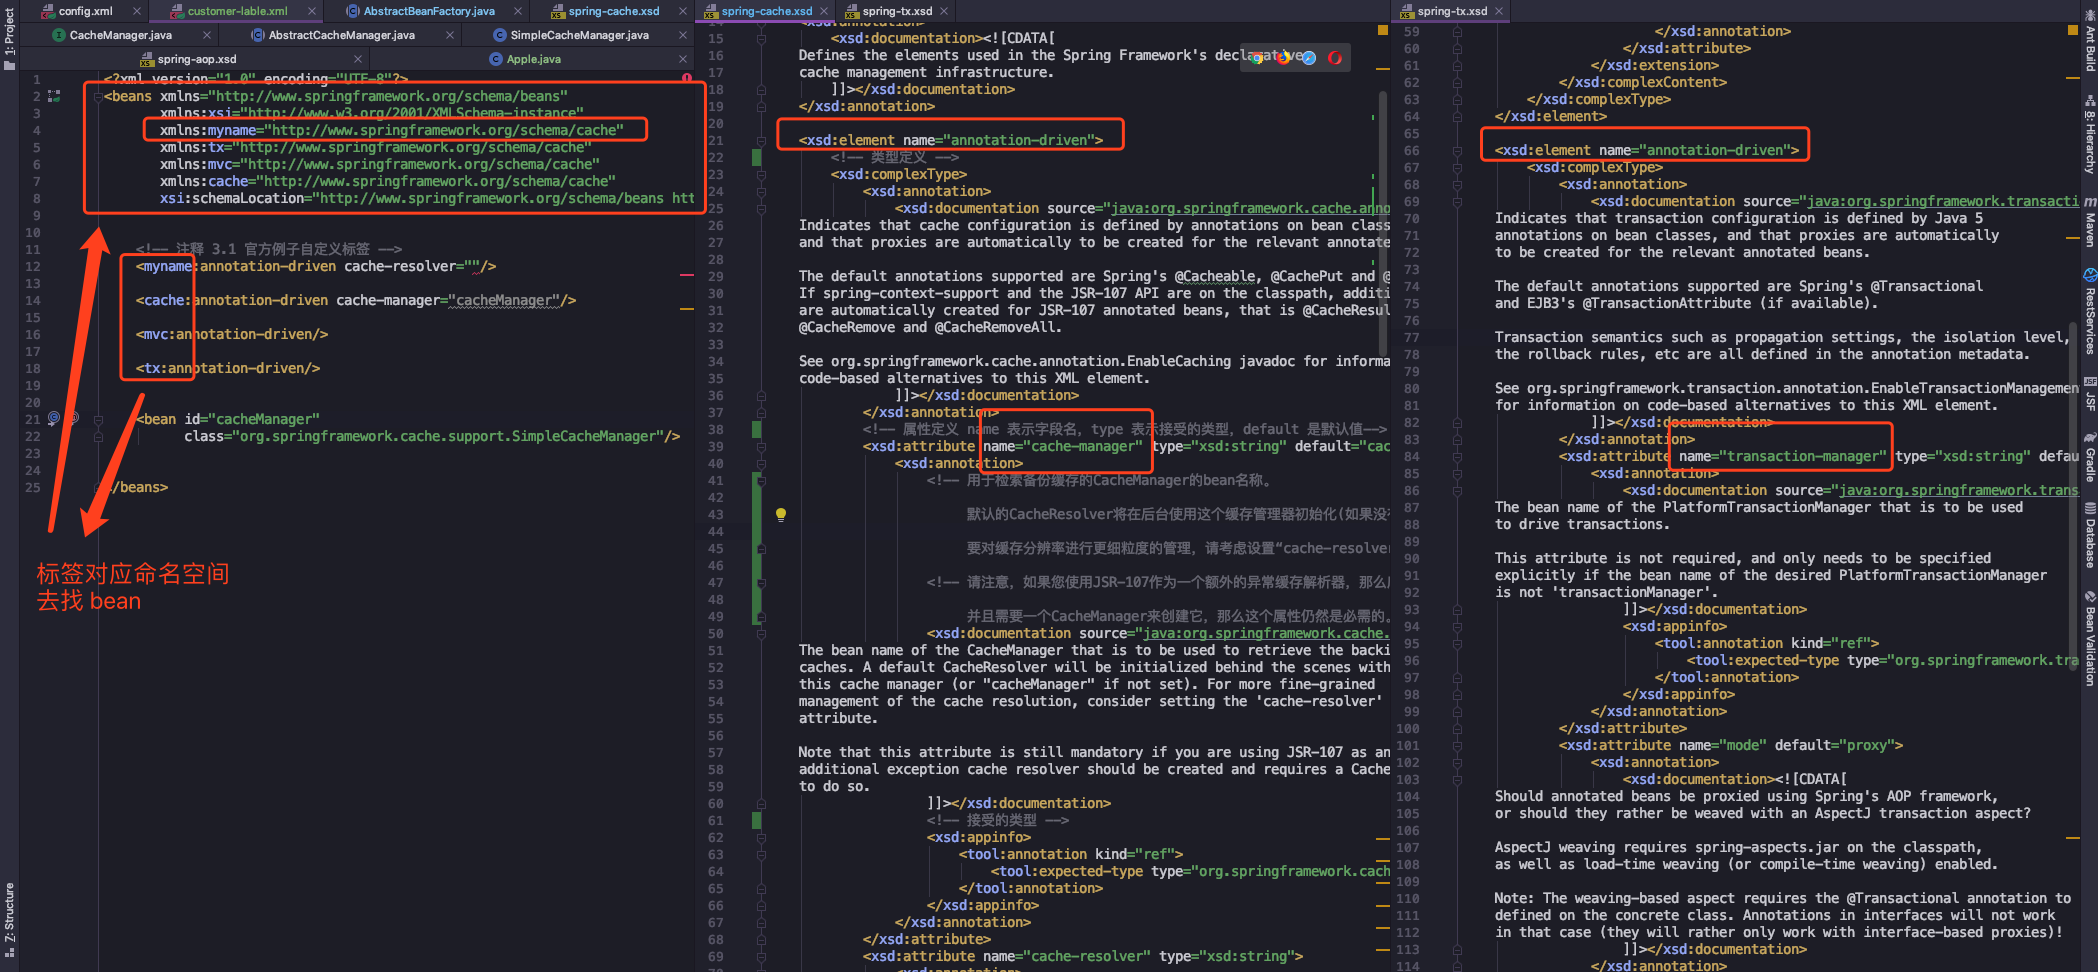
刚才说了缓存和事务,那就拿这两个举例,还有一个标签 <myname:>(这个我也不太清楚,网上查的资料也不多,所以按照我的理解大家跟说下)

首先我们看到,<tx> <cache> <mvc><myname> 都是自定义标签,左一是配置文件,进行 bean 的定义,顶部的 xmlns 是命名空间,表示标签所属的定义文件,像事务、缓存、MVC 的命名空间都是固定的。

myname 相当于万金油,既可以定义为事务,又可以定义为缓存,只要我们在命名空间中进行相应的定义就能正确的识别。这个就是我们待会要使用到的自定义标签,通过命名空间定位到我们想要的处理逻辑。

中间的是缓存定义的 xsd 文件,通过 <xsd:element name="annotation-driven"> 定义元素,<xsd:complexType> 区间内定义属性列表,<xsd:attribute> 定义单个属性,详细分析可以看下注释~

右边的是事务定义的 xsd 文件,大体内容的跟中间一样,虽然元素名称 <annotation-driven> 有相同的,但是下面的属性定义是有所区别的。

所以我们对自定义注解有个大概的了解,xsd 描述文件是个其中一个关键,在配置文件顶部的命名空间是标签进行解析时,进行定位的配置,当然还有处理器,下面使用时进行介绍。

不知道理解的对不对,如果有误的话请大佬们指出,我会进行修改的!


自定义标签使用

Spring 提供了可扩展的 Schema 的支持,扩展 Spring 自定义标签配置需要以下几个步骤:

  • 创建一个需要扩展的组件
  • 定义一个 XSD 描述文件
  • 创建一个文件,实现 BeanDefinitionParse 接口,用来解析 XSD 文件中的定义和组件定义。
  • 创建一个 Handler 文件,扩展自 NamespaceHandlerSupport,将组件注册到 Spring 容器
  • 编写 Spring.handlersSpring.schemas 文件

刚开始看到这些流程时,我还是有点慌的,毕竟从一个使用默认标签的萌新小白,突然要我自己定义,感觉到很新鲜,所以请各位跟着下面的流程一起来看吧~


定义普通的 POJO 组件

这个没啥好说的,就是一个普通的类:

1
2
3
4
5
6
7
8
public class Product {

private Integer productId;

private String unit;

private String name;
}

定义 XSD 描述文件

custom-product.xsd

1
2
3
4
5
6
7
8
9
10
11
12
13
14
15
<xsd:schema targetNamespace="http://vip-augus.github.io/schema/product"
xmlns:xsd="http://www.w3.org/2001/XMLSchema"
elementFormDefault="qualified">
<!-- 注释 3.4 自定义元素 -->
<xsd:element name="product">
<xsd:complexType>
<!-- 这个是类注册时的名字,组件中请不要占用该字段~ -->
<xsd:attribute name="id" type="xsd:string"/>
<!-- 属性定义列表,名字和类型 -->
<xsd:attribute name="productId" type="xsd:integer"/>
<xsd:attribute name="unit" type="xsd:string"/>
<xsd:attribute name="name" type="xsd:string"/>
</xsd:complexType>
</xsd:element>
</xsd:schema>

我在上面的描述文件中,定义了一个新的 targetNamespace,同时定义了一个 叫 product 的新元素,并且将组件中的属性都列在 <xsd:attribute> 中。XSD 文件是 XML DTD 的替代者,具体就不多深入,感兴趣的同学可以继续深入了解。


定义组件解析器

base.label.custom.ProductBeanDefinitionParser

1
2
3
4
5
6
7
8
9
10
11
12
13
14
15
16
17
18
19
20
21
22
23
24
25
26
27
28
public class ProductBeanDefinitionParser extends AbstractSingleBeanDefinitionParser {

@Override
protected Class getBeanClass(Element element) {
// 返回对应的类型
return Product.class;
}

// 从 element 中解析并提取对应的元素
@Override
protected void doParse(Element element, BeanDefinitionBuilder builder) {

String productId = element.getAttribute("productId");
String productName = element.getAttribute("name");
String productUnit = element.getAttribute("unit");
// 将提取到的数据放入 BeanDefinitionBuilder 中,等到完成所有 bean 的解析之后统一注册到 beanFactory 中
if (productId != null) {
// element.getAttribute("") 方法取出来的都是 string 类型,使用时记得手动转换
builder.addPropertyValue("productId", Integer.valueOf(productId));
}
if (StringUtils.hasText(productName)) {
builder.addPropertyValue("name", productName);
}
if (StringUtils.hasText(productUnit)) {
builder.addPropertyValue("unit", productUnit);
}
}
}

关键点在于,我们的解析器是继承于 AbstractSingleBeanDefinitionParser,重载了两个方法,详细用途请看注释~


创建处理类的注册器

base.label.custom.ProductBeanHandler

1
2
3
4
5
6
7
8
public class ProductBeanHandler extends NamespaceHandlerSupport {

@Override
public void init() {
// 将组件解析器进行注册到 `Spring` 容器
registerBeanDefinitionParser("product", new ProductBeanDefinitionParser());
}
}

这个类也比较简单,关键是继承了 NamespaceHandlerSupport,对他进行了扩展,在该类初始化时将组件解析器进行注册到 Spring 容器中。


编写 spring.hanldersspring.schemas 文件

我将文件位置放在 resources -> META-INF 目录下:

spring.handlers

1
http\://vip-augus.github.io/schema/product=base.label.custom.ProductBeanHandler

spring.schemas

1
http\://vip-augus.github.io/schema/product.xsd=custom/custom-product.xsd

到了这一步,自定义的配置就结束了。下面是如何使用


使用 Demo

配置文件

1
2
3
4
5
6
7
8
9
10
11
12
<?xml version="1.0" encoding="UTF-8"?>
<!-- 注意 schema 位置,最后两行是我新增的自定义配置 -->
<beans xmlns="http://www.springframework.org/schema/beans"
xmlns:xsi="http://www.w3.org/2001/XMLSchema-instance"
xmlns:myname="http://vip-augus.github.io/schema/product"
xsi:schemaLocation="http://www.springframework.org/schema/beans
http://vip-augus.github.io/schema/product
http://vip-augus.github.io/schema/product.xsd">

<!-- 自定义标签使用 -->
<myname:product id="product" productId="1" name="Apple" unit="台"/>
</beans>

测试代码

1
2
3
4
5
6
7
8
public class ProductBootstrap {
public static void main(String[] args) {
ApplicationContext context = new ClassPathXmlApplicationContext("custom/custom-label.xml");
Product product = (Product) context.getBean("product");
// 输出 Product{, productId ='1', unit='台', name='Apple'}
System.out.println(product.toString());
}
}

小结

现在来回顾一下,Spring 遇到自定义标签是,加载自定义的大致流程:

  • 定位 spring.hanldersspring.schemas:在两个文件中找到对应的 handlerXSD,默认位置在 resources -> META-INF
  • Handler 注册 Parser:扩展了 NamespaceHandlerSupport 的类,在初始化注册解析器
  • 运行解析器 Parser:扩展了 AbstractSingleBeanDefinitionParser,通过重载方法进行属性解析,完成解析。

上面已经将自定义注解的使用讲了,接下来讲的是源码中如何对自定义标签进行解析。


自定义标签解析

在上一篇笔记中,讲了如何解析默认标签,Spring 判断一个标签不是默认标签的话,就会将这个标签解析交给自定义标签的解析方法

直接定位到解析自定义标签的方法吧:

org.springframework.beans.factory.xml.BeanDefinitionParserDelegate#parseCustomElement(org.w3c.dom.Element, org.springframework.beans.factory.config.BeanDefinition)

1
2
3
4
5
6
7
8
public BeanDefinition parseCustomElement(Element ele, @Nullable BeanDefinition containingBd) {
// 注释 3.8 ① 找到命名空间
String namespaceUri = getNamespaceURI(ele);
// ② 根据命名空间找到对应的 NamespaceHandler
NamespaceHandler handler = this.readerContext.getNamespaceHandlerResolver().resolve(namespaceUri);
// ③ 调用自定义的 NamespaceHandler 进行解析
return handler.parse(ele, new ParserContext(this.readerContext, this, containingBd));
}

看着流程是不是觉得很熟悉,我们刚才在自定义标签使用时,定义的文件顺序是一样的,下面来讲下这三个方法,具体代码不会贴太多,主要记录一些关键方法和流程,详细代码和流程请下载我上传的工程~


① 获取标签的命名空间

1
2
3
public String getNamespaceURI(Node node) {
return node.getNamespaceURI();
}

这个方法具体做的事情很简单,而且传参的类型 org.w3c.dom.Node,已经提供了现成的方法,所以我们只需要调用即可。


② 根据命名空间找到对应的 NamespaceHandler

具体解析方法这这个类中:

org.springframework.beans.factory.xml.DefaultNamespaceHandlerResolver#resolve

1
2
3
4
5
6
7
8
9
10
11
12
13
14
15
16
17
18
19
20
21
22
23
24
25
26
27
28
29
public NamespaceHandler resolve(String namespaceUri) {
// 注释 3.9 获取所有已经配置的 handler 映射
Map<String, Object> handlerMappings = getHandlerMappings();
// 从 map 中取出命名空间对应的 NamespaceHandler 的 className
// 这个映射 map 值,没有的话,会进行实例化类,然后放入 map,等下次同样命名空间进来就能直接使用了
Object handlerOrClassName = handlerMappings.get(namespaceUri);
if (handlerOrClassName == null) {
return null;
}
else if (handlerOrClassName instanceof NamespaceHandler) {
return (NamespaceHandler) handlerOrClassName;
}
else {
String className = (String) handlerOrClassName;

Class<?> handlerClass = ClassUtils.forName(className, this.classLoader);
if (!NamespaceHandler.class.isAssignableFrom(handlerClass)) {
throw new FatalBeanException("Class [" + className + "] for namespace [" + namespaceUri +
"] does not implement the [" + NamespaceHandler.class.getName() + "] interface");
}
// 实例化类
NamespaceHandler namespaceHandler = (NamespaceHandler) BeanUtils.instantiateClass(handlerClass);
// 调用 handler 的 init() 方法
namespaceHandler.init();
// 放入 handler 映射中
handlerMappings.put(namespaceUri, namespaceHandler);
return namespaceHandler;
}
}

找对应的 NamespaceHandler,关键方法在于 getHandlerMappings()

1
2
3
4
5
6
7
8
9
10
11
12
13
14
15
16
17
private Map<String, Object> getHandlerMappings() {
Map<String, Object> handlerMappings = this.handlerMappings;
// 如果没有缓存,进行缓存加载,公共变量,加锁进行操作,细节好评👍
if (handlerMappings == null) {
synchronized (this) {
handlerMappings = this.handlerMappings;
if (handlerMappings == null) {
Properties mappings =
PropertiesLoaderUtils.loadAllProperties(this.handlerMappingsLocation, this.classLoader);
handlerMappings = new ConcurrentHashMap<>(mappings.size());
CollectionUtils.mergePropertiesIntoMap(mappings, handlerMappings);
this.handlerMappings = handlerMappings;
}
}
}
return handlerMappings;
}

所以我们能看到,找 Handler 时,使用的策略是延迟加载,在 map 缓存中找到了直接返回,没找到对应的 Handler,将处理器实例化,执行 init() 方法,接着将 Handler 放入 map 缓存中,等待下一个使用。


③ 调用自定义的 NamespaceHandler 进行解析

回忆一下,我们在自定义标签解析的时候,是没有重载 parse() 方法,所以定位进去,看到实际调用方法是这两行:

org.springframework.beans.factory.xml.NamespaceHandlerSupport#parse

1
2
3
4
5
6
public BeanDefinition parse(Element element, ParserContext parserContext) {
// 寻找解析器并进行解析操作
BeanDefinitionParser parser = findParserForElement(element, parserContext);
// 真正解析调用调用的方法
return (parser != null ? parser.parse(element, parserContext) : null);
}

第一步获取解析器,就是我们之前在 init() 方法中,注册到 Spring 容器的解析器。

第二步才是解析器进行解析的方法,我们的解析器扩展的是 AbstractSingleBeanDefinitionParser所以实际是调用了我们解析器父类的父类 AbstractBeanDefinitionParserparse 方法:

org.springframework.beans.factory.xml.AbstractBeanDefinitionParser#parse

1
2
3
4
5
6
public final BeanDefinition parse(Element element, ParserContext parserContext) {
// 注释 3.10 实际自定义标签解析器调用的方法,在 parseInternal 方法中,调用了我们重载的方法
AbstractBeanDefinition definition = parseInternal(element, parserContext);
...
return definition;
}

解析关键方法

org.springframework.beans.factory.xml.AbstractSingleBeanDefinitionParser#parseInternal

1
2
3
4
5
6
7
8
9
10
11
12
13
14
15
16
17
18
19
20
21
22
23
24
25
26
27
28
29
30
protected final AbstractBeanDefinition parseInternal(Element element, ParserContext parserContext) {
BeanDefinitionBuilder builder = BeanDefinitionBuilder.genericBeanDefinition();
String parentName = getParentName(element);
if (parentName != null) {
builder.getRawBeanDefinition().setParentName(parentName);
}
Class<?> beanClass = getBeanClass(element);
if (beanClass != null) {
builder.getRawBeanDefinition().setBeanClass(beanClass);
}
else {
String beanClassName = getBeanClassName(element);
if (beanClassName != null) {
builder.getRawBeanDefinition().setBeanClassName(beanClassName);
}
}
builder.getRawBeanDefinition().setSource(parserContext.extractSource(element));
BeanDefinition containingBd = parserContext.getContainingBeanDefinition();
if (containingBd != null) {
// Inner bean definition must receive same scope as containing bean.
builder.setScope(containingBd.getScope());
}
if (parserContext.isDefaultLazyInit()) {
// Default-lazy-init applies to custom bean definitions as well.
builder.setLazyInit(true);
}
// 注释 3.11 在这里调用了我们写的解析方法
doParse(element, parserContext, builder);
return builder.getBeanDefinition();
}

这里我要倒着讲,在第二步解析时,不是直接调用了自定义的 doParse 方法,而是进行了一系列的数据准备,包括了 beanClassclasslazyInit 等属性的准备。

第一步解析,在我省略的代码中,是将第二步解析后的结果进行包装,从 AbstractBeanDefinition 转换成 BeanDefinitionHolder ,然后进行注册。转换和注册流程在第一篇笔记已经介绍过了,不再赘述。

到这里为止,我们自定义标签的解析就完成了~


总结

在我们自定义标签时,是不是感觉使用起来很简单,只需定义几个文件,然后在自定义解析器中写上业务处理逻辑,然后就能使用。

在我们分析完整个解析流程,就能看到,Spring 在背后默默帮我们完成了很多事情,类似默认标签解析过程,根据命名空间找到对应的处理器,然后再找到解析器,在解析器里面调用我们个性化的处理逻辑。

这两篇文章填了默认标签和自定义标签解析的坑,也完整的介绍了 Springbean 从配置中加载到内存中的全过程,下一篇开始分析解析类的加载~

由于个人技术有限,如果有理解不到位或者错误的地方,请留下评论,我会根据朋友们的建议进行修正

spring-analysis-note 码云 Gitee 地址

spring-analysis-note Github 地址


传送门:


参考资料

  1. Spring自定义标签使用及原理

  2. Spring 源码深度解析 / 郝佳编著. – 北京 : 人民邮电出版社